
Q: Is it hard to make a rocket? Can you provide plans for how to build a rocket, and step-by-step instructions?
A: Yes, it's easy, and the great thing is you can use items from the trash, and some inexpensive parts from your local plumbing hardware store. If you have ever built plastic models, paper airplanes, or model rockets you'll be right at home.
Be sure to read through the Tools, Materials, and Tricks discussion at the end of this article before you start building. There are also a great number of excellent online resources, so I've included some links to my favorites at the end.
Step-By-Step...
- Collect three 2-liter soda bottles.
- Select one bottle in the best condition, i.e. no scratches, dents, or abrasions, to be your motor.
- Remove the plastic cap ring with scissors or nippers.
- Install an 15/16 I.D x 1 1/8 O.D. (AS568A #119 size) o-ring onto the neck beyond the threads.
- Select a second bottle to make a fin ring.
- Mark fin center-lines for 3 fins on the bottle with a permanent marker and fin guide.
- Mark cut lines for a 3 1/2 inch section of the bottle that will become your fin ring.
- Cut the ring (and nose cone) from the bottle.
- Cut three corrugated cardboard fins using this template.
- Carefully glue the fins to the fin ring at the center-lines using a hot-glue gun or contact cement.
- Test-fit the fin-ring onto the motor. It should fit snugly around the bottom (around the neck) of of the motor.
- Set aside the fin/fin-ring assembly.
- Mark the remaining bottle for a cut near the bottom to form the rocket body.
- Cut the bottom off of the bottle.
- With an X-Acto knife, carefully cut the neck off the bottle just where the thin part of the bottle starts.
- Test-fit the rocket body onto the motor. It should fit snugly around the motor at the top (opposite the neck).
- Construct a nosecone from this template using card stock.
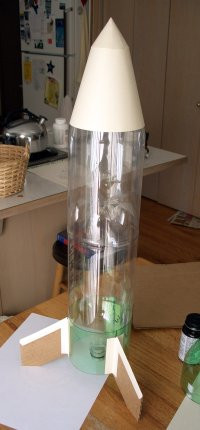
- Fit the body to the motor, align them carefully, and apply 1 inch strapping tape around the circumference.
- Fit the fin/fin-ring assembly to the motor/body assembly, align them carefully, and apply 1 inch strapping tape around the circumference.
- Connect a 10 inch length of kite string between the nose cone and the body using tape.
- Connect a 12 inch diameter parachute made from a trash can liner to the body using strapping tape.
NOTE: There are slight differences in the diameters of plastic bottles made by different manufacturers. It is advisable to select bottles all made by the same manufacturer.
NOTE: Keep this bottle away from sharp or abrasive tools, etc., to avoid damage and possible reduction of its pressure capacity.
NOTE: You may wish to save the top of this bottle to be your nose cone. In this case mark an additional cut line about 1/2 inch from the ring cut line.
|
NOTE: You may want to spray the fins with a light coat of primer to keep them dry.
|

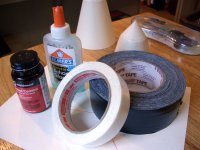
Here are some useful tools, materials, and tricks to help you with your rocket construction:
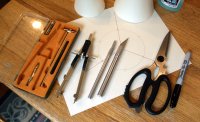
Tools
|
Sharp and sturdy scissiors are vital to making good cuts in plastic, paper, and cardboard. A pair of Buck scissors with a finely serrated edge are my favorite for cutting all materials. The advertisement shows them cutting a penny in half. I am sure they would, but don't try this!
These are especially useful for trimming tape, or for cutting fine details into plastic or paper. Keep these away from your plastic bottle motor, though, they may scatch and weaken it. A kit with two blade sizes is commonly available and perfect for the job.
You'll need these to make marks on your plastic bottles before cutting or glueing. "Permanent" is a relative term. You can remove permanent marks from plastic with rubbing alcohol if you make a mistake.
A drafting compass is great for dividing angles or drawing nose-cone design patterns. Some cone patterns may require a radius of 6-12 inches so you need a sturdy, adjustable, compass with an extension for the center pin.
Materials
|
Of course! Need I say more?
Seriously, this is the stuff to use for joining plastic parts together, or for adding strength to your plastic bottle motor. Also good for attaching the parachute to the rocket. Any place you need to add tensile strength.
Contact cement provides the quickest way to attach fins to your rocket. It is also very strong. Don't use contact cement on your plastic bottle motor as the powerful solvent in it could weaken the bottle. Use PL, below, any time you need to attach anything directly to your plastic bottle motor.
Good for constructing paper nose cones and cardboard fins. It takes a while to dry, making the job easier, but holding or clamping is required.
For any gluing directly to the plastic bottle motor use only PL, it won't weaken the plastic.
...and lots of them!
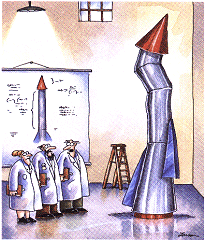
Far Side by
Gary Larsen
|
| "It's time to face reality, my friends... We're not exactly rocket scientists." |
Tricks
OK, so maybe these are not tricks, but just things that take a little practice.
The most important requirement in rocket construction is making it straight. Fins must be aligned with the centerline of the body, and distributed evenly around it in 3 or 4 places. Nose-cones and cylinders cut from bottles must be square, and aligned with the adjoining cylinders in the stack. So the old wood-working addage, "measure twice, cut once," makes sense here.
If the rocket isn't straight it will spin wildly or fly off in a direction that you don't want. This could ruin your whole day.
These tricks should help you build a straight and true rocket:
|
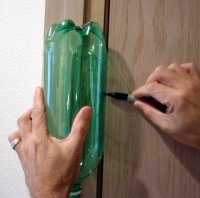
Make small marks on the bottle using a fin guide for the desired centerlines for each fin. Then use the frame of a door to draw the full line along the center of the bottle. Rest the bottle between the open door and the door frame. Lay the permanent marker on it's side on the door. Match the tip of the pen to the small mark for the fin by rotating the bottle. When they line-up carefully move the pen along the bottle, drawing the line, without moving the bottle. This produces a square and centered line.
|
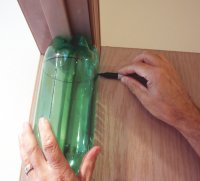
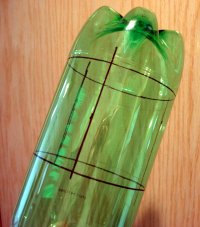
Draw all marks on the bottle before you cut. Once the bottle is cut it loses a lot of it's structure, thus making it harder to draw straight lines. Use an X-Acto knife to pierce the bottle about 1/2 inch away from the desired cut line.
|
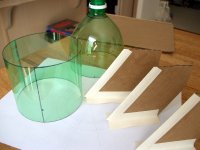
Pictured is a bottle that has been marked to form a 3.5 inch long ring that will mount on the motor and support three fins. We will use Contact Cement to attach fins to this ring, then tape the ring to the bottle motor.
For the impatient, contact cement is both a blessing and a curse; fins can be quickly glued to the fin ring, but a small mistake can be difficult to undo and parts cannot be repositioned once they touch. I recommend trying a few tests before you glue your carefully-made cardboard and paper fins to the fin ring!
Paint a thin coating of contact cement on either side of the fin lines drawn on your bottle ring. Then, paint a thin layer of contact cement on the fin. Let this dry for a few minutes before you mate the fin to the ring. Now you can carefully position the fin along the line, touch one end first, then carefully push the length of the fin along the line. Once the glue on the fin touches the glue on the fin ring they will stick. It is quite impossible to move them once they touch, so do this very carefully! Now press them together firmly to make sure that the whole contact surface has attached.
As you build your rocket, take a moment at each step to inspect your work. Spin the rocket on its axis to check for alignment of cylinder sections. This can be done before tape is applied, and adjustment can be made. Look down the centerline from the tip to tail to see if fins look straight and square. Slight bending of fins can sometimes straighten-out small errors.
for more information see:
Robert Youens Water Rocket Page
Nicely illustrated construction tutorial. Every kid should have a Mom like this.

Step-by-step illustrated construction for an easy rocket (in Japanese, but easy to follow).
Providing information on the construction, science, techniques and fun that is the Water Rocket hobby.
Videos, pictures, and descriptions of water rockets. Prof. Wheeler is pretty serious about science!
Air Command Water Rockets Home
Australian water rockets built out of common items found around the house. Includes construction details and practical advice. Very impressive single and two-stage rockets using plastic soda bottles and engineered components. Very impressive!
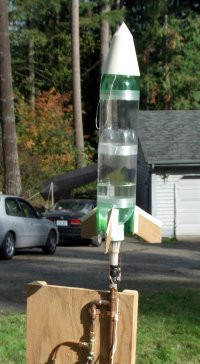
Mother Earth News, July/August 1983 -- "Using nothing more than water and compressed air for propulsion, the rocket will shoot well over 100 feet into the air . . . separate its first stage from its nose cone . . . and deploy a parachute to lower the cargo safely back to earth."
"Mix together empty soda/pop bottles, pvc pipe, a bicycle pump, a splash of water and what do you get? Water rockets! Nothing beats a homemade water rocket for hours of inexpensive fun. Join us for an exploration into the basics behind building and launching homemade water rockets."
PL Premium Polyurethane Construction Adhesive
The adhesive safe to use on water-rocket motor bottles without weakening them.

Question? Comment? Send A Message

216.73.216.22
